
Here’s a comprehensive guide on server-side tagging implementation using Google Tag Manager:
Overview
Server-side tagging represents a paradigm shift in how we handle analytics and marketing tags, moving processing from the client’s browser to a controlled server environment. This guide provides a complete implementation walkthrough using Google Tag Manager’s server-side capabilities.
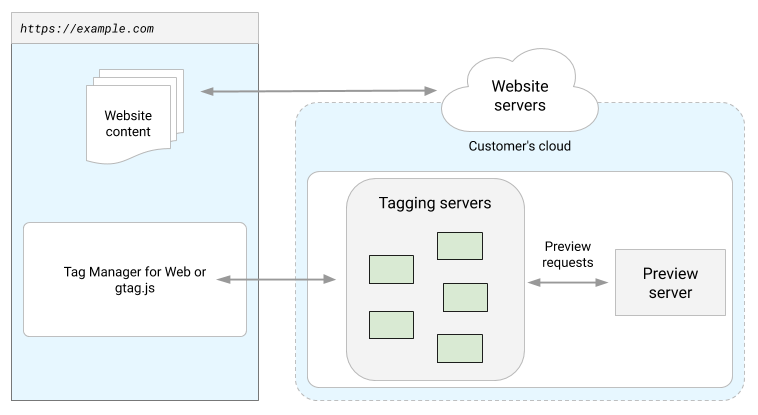
Server-side tagging with Google Tag Manager moves tag processing out of the browser and into a server container you run on Google Cloud. The browser sends one request to your own subdomain; the server then forwards clean, controlled data to GA4, Google Ads, Meta, and other vendors. You gain speed, first-party cookies, and tighter control over what leaves your site.
1. Introduction to Server-Side Tagging
What server-side tagging actually is (and the problem it solves)
Think of a busy restaurant. In a client-side setup, every diner walks straight into the kitchen and shouts their order at whichever cook they can find. It’s chaotic, slow, and anyone can overhear.
Server-side tagging adds a waiter. The diner (the browser) gives one order to the waiter (your tagging server). The waiter walks it back to the kitchen (GA4, Google Ads, Meta), takes care of the details, and returns. The dining room stays calm, and the diner never sees the kitchen.
That waiter is a server container running on Google Cloud. Your website sends its data to your subdomain instead of to a dozen third-party domains. The container then decides what to forward, to whom, and in what shape.
The problem this solves is control. In the browser, you don’t really own the pipeline — the browser does, ad blockers do, and privacy features like Safari’s ITP do. Move the pipeline server-side and you get to decide how long cookies live, what data is enriched or dropped, and which vendors receive what.
Client-side vs server-side tagging: a straight comparison
Neither approach is “better” in the abstract — they solve different problems. Here’s how they stack up.
| Client-side tagging | Server-side tagging | |
|---|---|---|
| Where tags run | In the visitor’s browser | In your server container on Google Cloud |
| Page performance | More scripts, heavier pages | Fewer scripts, lighter pages |
| Cookie lifespan | Short-lived (browsers cap JS cookies) | Durable, server-set HttpOnly cookies |
| Data control | Limited — vendors get raw data | Full — you reshape, enrich, or drop data |
| Setup complexity | Low, mostly point-and-click | Higher — cloud, subdomain, clients |
| Ongoing cost | Effectively free | ~$45+/month per Cloud Run instance |
| Best for | Small sites, quick launches | E-commerce, high traffic, strict privacy |
A useful mental model: client-side is the default because it’s free and easy. Server-side is the upgrade you buy when data quality, cookie durability, or privacy control starts costing you money.
You rarely rip out one for the other. Most teams run a hybrid — the web container still fires in the browser, but it hands its most valuable events (purchases, leads, GA4 hits) to the server container for forwarding.
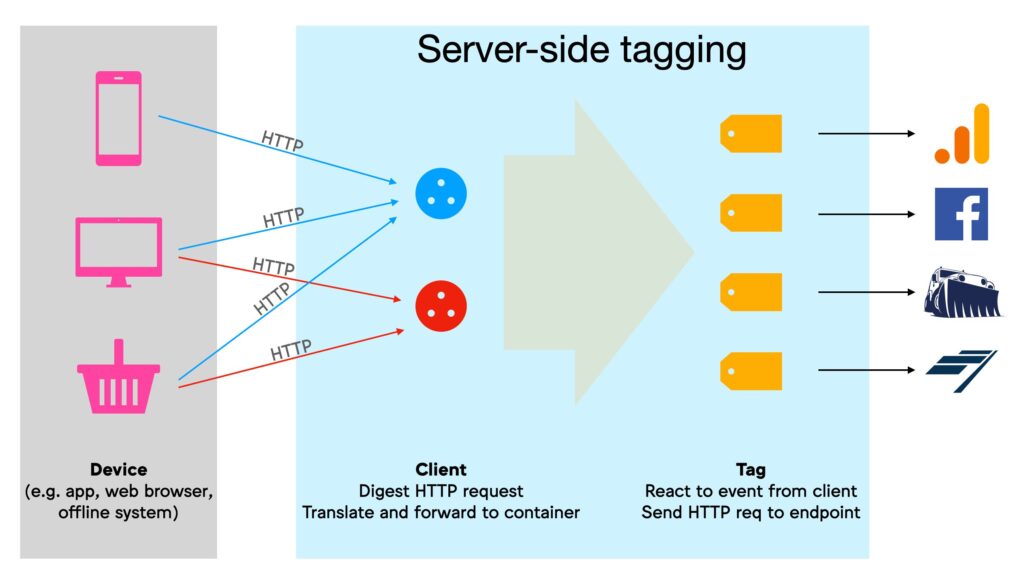
How the data flows: browser → tagging server → vendors
Before touching any settings, picture the journey of a single event. It’s simple on paper and worth internalizing, because every debugging session traces this same path.
- The browser fires an event. A visitor buys something; your web container captures a
purchaseevent. - The hit goes to your subdomain. Instead of
google-analytics.com, the request lands onsst.yourdomain.com, a first-party address. - A client claims the request. Inside the server container, a client (for example, the GA4 client) recognizes the request format and turns it into an event object.
- Triggers and tags fire. That event runs through triggers and tags exactly like a web container a GA4 tag, a Google Ads tag, a Meta CAPI tag.
- The server forwards to vendors. Each tag makes a server-to-server call to its destination.
The single most important word there is client. In a web container, a “tag” sends data out. In a server container, a client is the piece that receives and interprets incoming data first. Get the client wrong and nothing else fires — which is exactly why the classic error message is “No client claimed the request.”
What you need before you start
Server-side tagging has more moving parts than dropping a snippet on a page. Line these up first and the setup goes smoothly.
- A Google Cloud Platform account with billing enabled. The server runs here, and yes, it costs money.
- A Google Tag Manager account with an existing web container already collecting data.
- A domain you control, so you can point a subdomain like
sst.yourdomain.comat the server. - The right GCP roles at minimum Project Creator and Billing Account User, so you can actually deploy.
- A GA4 property (or whichever destination you’re forwarding to) ready to receive data.
One prerequisite people skip: a real reason. If your pages are already fast, your conversions already track cleanly, and you have no privacy pressure, sGTM is complexity you don’t yet need. The best implementations start with a specific goal recover Safari conversions, extend cookie life, or move Meta tracking server-to-server.
Benefits
- Improved Site Performance : By offloading tag execution to the server, client-side page load times are reduced, leading to faster website performance and improved user experience.
- Enhanced Data Security : Sensitive data is processed on the server rather than being exposed in the client’s browser, minimizing the risk of data breaches or unauthorized access.
- Better Data Quality : Server-side tagging eliminates issues caused by ad blockers, browser extensions, or incomplete client-side scripts, ensuring cleaner and more reliable data collection.
- Reduced Client-Side Code : With fewer tags running on the client side, your website’s codebase becomes lighter, easier to maintain, and less prone to errors.
- Greater Control Over Data Collection : You have full control over how data is collected, transformed, and sent to various destinations, enabling advanced customization and optimization.
Use Cases
- E-commerce Tracking : Accurately track purchases, cart abandonments, and other critical e-commerce events without relying on client-side scripts that may fail due to ad blockers or technical issues.
- Enhanced Conversion Tracking : Gain deeper insights into conversions by processing and enriching data on the server before sending it to analytics platforms. For example, append additional metadata or calculate custom metrics.
- Custom Event Processing : Handle complex event logic, such as combining multiple events into a single meaningful action, filtering out unwanted data, or triggering specific workflows based on predefined conditions.
- Data Privacy Compliance : Ensure compliance with regulations like GDPR or CCPA by anonymizing or masking sensitive information at the server level before transmitting it to third-party tools.
- Ad-Blocker Circumvention : Bypass common ad-blocking techniques that block client-side tags, ensuring your tracking remains unaffected and continues to collect valuable data even when users employ ad blockers.
2. Setup Requirements
Step 1 — Create your GTM server container
You don’t convert a web container into a server one; you create a new container with a different target platform.
- In Tag Manager, open the relevant account and choose Create Container.
- Give it a name, then under Target platform pick Server.
- Click Create. A dialog appears asking how you want to provision the tagging server.
At the provisioning dialog you’ll see two paths. Automatic provisioning is the fastest — Google spins up the Cloud Run service for you and hands back a temporary run.app URL. Manual provisioning lets you deploy into an existing GCP project (or your own infrastructure) with full control.
For a first build, automatic provisioning gets you moving in minutes. For anything production-grade, most practitioners deploy to Cloud Run manually so they own the project, the region, and the billing. We’ll cover that next.
Before you leave this screen, grab your container config string — click the container ID in the top bar to reveal it. Cloud Run needs it as an environment variable.
Technical Prerequisites
// Required Google Cloud Platform setup
{
“project_id”: “your-project-id”,
“region”: “us-central1”,
“tagging_server”: {
“machine_type”: “n1-standard-1”,
“container_size”: “2”
}
}
Infrastructure Requirements
- Google Cloud Platform account
- Google Tag Manager account
- Server-side container
- Domain/subdomain for tagging server
- SSL certificate
3. Implementation Steps
Infrastructure Requirements
Complete Implementation Guide
Updated for 2026
Server-Side Tagging with Google Tag Manager: The Complete Setup Guide
TL;DR
- What: a Google-hosted server that receives your tracking data and forwards it to vendors, instead of the browser talking to each vendor directly.
- Where it runs: Google Cloud Run is now the default and recommended deployment. App Engine still works but is the legacy path.
- Must-dos: map a subdomain (
sst.yourdomain.com), wire Consent Mode v2, and confirm real hits in Preview before trusting data. - Honest caveat: sGTM is not an ad-blocker silver bullet — the real wins are first-party cookies and server-to-server APIs like Meta CAPI.
- Cost: budget roughly $45/month per Cloud Run instance, and run at least two.
Most tracking setups ask the visitor’s browser to do a surprising amount of work. Every analytics pixel, every ad tag, every “measure this” script loads in the page, runs on the user’s device, and phones home to a different company. Server-side tagging takes that pile of work off the browser’s plate and hands it to a server you control.
What server-side tagging actually is
Think of a busy restaurant. In a client-side setup, every diner walks straight into the kitchen and shouts their order at whichever cook they can find. It’s chaotic, slow, and anyone can overhear.
Server-side tagging adds a waiter. The diner (the browser) gives one order to the waiter (your tagging server). The waiter walks it back to the kitchen — GA4, Google Ads, Meta — takes care of the details, and returns. The dining room stays calm, and the diner never sees the kitchen.
That waiter is a server container running on Google Cloud. Your site sends data to your subdomain instead of to a dozen third-party domains. The container then decides what to forward, to whom, and in what shape.
Client-side vs server-side: a straight comparison
Neither approach is “better” in the abstract — they solve different problems. Flip the switch below to see how the same purchase event behaves in each model.
| Client-side tagging | Server-side tagging | |
|---|---|---|
| Where tags run | In the visitor’s browser | In your server container on Google Cloud |
| Page performance | More scripts, heavier pages | Fewer scripts, lighter pages |
| Cookie lifespan | Short-lived (browsers cap JS cookies) | Durable, server-set HttpOnly cookies |
| Data control | Limited — vendors get raw data | Full — reshape, enrich, or drop data |
| Setup complexity | Low, mostly point-and-click | Higher — cloud, subdomain, clients |
| Ongoing cost | Effectively free | ~$45+/month per Cloud Run instance |
| Best for | Small sites, quick launches | E-commerce, high traffic, strict privacy |
You rarely rip out one for the other. Most teams run a hybrid — the web container still fires in the browser, but it hands its most valuable events to the server container for forwarding.
How the data flows: browser → server → vendors
Before touching any settings, picture the journey of a single event. Every debugging session traces this same path, so press Send test event and watch it move.
🌐 Browser
fires the event🖥️ Tagging server
sst.yourdomain.com📊 Vendors
GA4 · Ads · MetaThe single most important word there is client. In a web container, a “tag” sends data out. In a server container, a client is the piece that receives and interprets incoming data first. Get the client wrong and nothing fires — which is why the classic error is “No client claimed the request.”
What you need before you start
Server-side tagging has more moving parts than dropping a snippet on a page. Line these up first:
- A Google Cloud Platform account with billing enabled — the server runs here.
- A Google Tag Manager account with an existing web container.
- A domain you control, to point a subdomain like
sst.yourdomain.comat the server. - The right GCP roles — at minimum Project Creator and Billing Account User.
- A GA4 property (or your chosen destination) ready to receive data.
One prerequisite people skip: a real reason. If your pages are fast, conversions track cleanly, and you have no privacy pressure, sGTM is complexity you don’t yet need.
Step 1 — Create your GTM server container
You don’t convert a web container into a server one; you create a new container with a different target platform.
- In Tag Manager, open the relevant account and choose Create Container.
- Name it, then under Target platform pick Server.
- Click Create. A dialog appears asking how to provision the tagging server.
Automatic provisioning spins up Cloud Run for you and returns a temporary
run.app URL. Manual provisioning lets you deploy into your own GCP project
with full control. Before you leave this screen, grab your container config string —
click the container ID in the top bar. Cloud Run needs it.
Step 2 — Deploy the tagging server on Google Cloud Run
Here’s the biggest correction to older guides: the server container runs on Cloud Run now.
App Engine flex was the original recommendation, and plenty of tutorials still show it.
Google switched the default to Cloud Run, and its own docs list Cloud Run as recommended — App Engine is
the legacy path.
Why the change? Cloud Run scales to zero, deploys to multiple regions with a copy-paste, and usually costs less for the same reliability. Open Cloud Shell and run this:
# 1) Point gcloud at your project
gcloud config set project your-project-id

# 2) Deploy (or update) the PRODUCTION tagging server on Cloud Run
gcloud run deploy server-side-tagging \
  --region us-central1 \                                          # a region near your users
  --image gcr.io/cloud-tagging-10302018/gtm-cloud-image:stable \  # official sGTM image
  --platform managed \
  --ingress all \                                                 # public collector endpoint
  --min-instances 2 \                                             # keep 2 warm -> no data loss on outage
  --max-instances 10 \                                            # autoscaling ceiling
  --timeout 60 \                                                  # request timeout (seconds)
  --no-cpu-throttling \                                           # CPU always allocated -> lower latency
  --allow-unauthenticated \
  --update-env-vars \
    PREVIEW_SERVER_URL=https://server-side-tagging-preview-xxxxx-uc.a.run.app,\
CONTAINER_CONFIG=PASTE_YOUR_CONTAINER_CONFIG_STRING_FROM_GTM

# ~$45/month per instance (1 vCPU, 0.5 GB, always-on). 2-10 instances
# handle roughly 35-350 requests/sec depending on how much your tags do.
Keep it updated. Google ships security fixes into
new image versions. When Tag Manager prompts you — especially across major versions — deploy a fresh
revision using the same settings and the :stable image.
Step 3 — Map a custom subdomain (where the magic happens)
The run.app URL works, but it’s still Google-owned. Map a subdomain of your site
and everything changes: the server can now set first-party cookies, including
HttpOnly ones that JavaScript — and the browser privacy features that hunt JS cookies —
can’t touch.
# Map a subdomain straight to the Cloud Run service (managed TLS included)
gcloud beta run domain-mappings create \
  --service server-side-tagging \
  --domain sst.yourdomain.com \
  --region us-central1

# Google returns a DNS record. Add it at your DNS provider, e.g.:
#   Type: CNAME   Name: sst   Value: ghs.googlehosted.com.
# Then add https://sst.yourdomain.com in GTM > Admin > Container Settings.
# (For multi-region / high traffic, put an external HTTPS load balancer in front instead.)
Use a genuine subdomain of your main site, not a lookalike domain. Cookies from
sst.yourdomain.com count as first-party for yourdomain.com. Cookies from
your-tracking-cdn.com do not — and you’ll lose the whole benefit.
Step 4 — Clients, tags, and the first-party loader
With the server live and the subdomain mapped, you configure the container much like a web one — with clients doing the extra job of catching incoming data. Add the built-in GA4 client so the container understands GA4 hits, build a trigger on your event, and attach a GA4 tag that forwards to your property.
Accuracy note: since sGTM v3.2.0
(Sept 2025) the GA4 client no longer loads gtag.js itself — Google’s JS libraries
are served through the Google Tag (Web) client. If a pre-2025 tutorial looks different, that’s why.
Load the container from your subdomain
This is where copied-and-pasted guides quietly break. The correct path is
/gtm.js?id=GTM-XXXXXXX on your subdomain. Some older snippets build
/GTM-XXXXXXX.js, which doesn’t exist on a tagging server and fails silently.
<!-- Google Tag Manager: load the container from YOUR tagging domain -->
<script>
(function(w,d,s,l,i){
  w[l] = w[l] || [];
  w[l].push({'gtm.start': new Date().getTime(), event:'gtm.js'});
  var f = d.getElementsByTagName(s)[0],
      j = d.createElement(s),
      dl = l != 'dataLayer' ? '&l=' + l : '';
  j.async = true;
  // KEY LINE: your subdomain + the REAL /gtm.js?id= path
  j.src = 'https://sst.yourdomain.com/gtm.js?id=' + i + dl;
  f.parentNode.insertBefore(j, f);
})(window, document, 'script', 'dataLayer', 'GTM-XXXXXXX');   // your WEB container ID
</script>
<!-- End Google Tag Manager -->
Route GA4 data to the server
Loading the container first-party is half the job. The other half: tell your GA4 tag to send its
measurement data to the server via server_container_url. Do both, or you’ll load
the container from your domain while your hits still fly straight to Google.
<!--
  In GTM, open your GA4 "Google Tag" (web container) and add this field:
      Configuration parameter:  server_container_url
      Value:                    https://sst.yourdomain.com
  The gtag() equivalent is shown below.
-->
<script>
  gtag('config', 'G-XXXXXXXXXX', {
    'server_container_url': 'https://sst.yourdomain.com', // send hits to YOUR server
    'first_party_collection': true
  });
</script>
First-party cookies via the server container
Durable cookies are a headline reason to go server-side. When your server sets a cookie, it can mark
it HttpOnly and Secure and give it a long life — a stable visitor ID that
outlives the short-lived cookies browsers assign to client-side scripts.
Same visitor, same site — the only difference is who set the cookie and whether JavaScript can see it.
// Sandboxed server-side JS. Every API must be require()'d — there are no globals.
const setCookie          = require('setCookie');
const getCookieValues    = require('getCookieValues');
const getTimestampMillis = require('getTimestampMillis'); // no Date.now() in the sandbox
const generateRandom     = require('generateRandom');

// Reuse the visitor's existing first-party ID if we already set one
let clientId = getCookieValues('FPID')[0];
if (!clientId) {
  clientId = getTimestampMillis() + '.' + generateRandom(1e10, 1e11);
}

setCookie('FPID', clientId, {
  domain: 'auto',      // binds to the tagging subdomain's registrable domain
  path: '/',
  'max-age': 63072000, // 2 years, in SECONDS
  secure: true,
  httpOnly: true,      // invisible to document.cookie -> survives ITP / JS wipes
  sameSite: 'Lax'
});
// Add 'FPID' + your domain to the template's "Sets cookies" permission,
// or setCookie() throws: Permission 'set_cookies' failed.
The sandbox is not the browser
Server-side templates run in a locked-down sandbox with its own API surface. Habits from browser JS throw errors — this list is the source of most first-day frustration:
- No global
JSON— you mustconst JSON = require('JSON'). Date.now()/new Date()are gone — userequire('getTimestampMillis').fetch()doesn’t exist — userequire('sendHttpRequest').console.logis replaced byrequire('logToConsole').- No regex literals and no
Object.keys()— use string methods orrequire('Object'). - Always call
claimRequest()before any line that might throw.
Older guides showing new Date().toISOString() inside a “server-side” template are, in
fact, showing browser code that won’t run in the sandbox at all.
const claimRequest      = require('claimRequest');
const getRequestPath    = require('getRequestPath');
const getRequestBody    = require('getRequestBody');
const runContainer      = require('runContainer');
const returnResponse    = require('returnResponse');
const setResponseStatus = require('setResponseStatus');
const setResponseHeader = require('setResponseHeader');
const setResponseBody   = require('setResponseBody');
const JSON              = require('JSON'); // the global JSON object does NOT exist here

if (getRequestPath() === '/collect-custom') {
  claimRequest(); // take ownership FIRST, before anything that could throw

  const events = JSON.parse(getRequestBody()); // expects a JSON array of events
  let pending = events.length;

  events.forEach(function (event) {
    runContainer(event, function () {  // push each event through triggers + tags
      pending = pending - 1;
      if (pending === 0) {
        setResponseStatus(200);
        setResponseHeader('Content-Type', 'application/json');
        setResponseBody('{"status":"ok"}');
        returnResponse();
      }
    });
  });
}
Consent Mode v2 with server-side tagging
If you have any EEA traffic, this isn’t optional. Since March 2024, Google requires
Consent Mode v2 for advertisers targeting the EEA/UK who want to keep using measurement, remarketing,
and audience features. It added two signals — ad_user_data and
ad_personalization — on top of ad_storage and analytics_storage.
Tap a signal to grant/deny it:
The pattern is: deny everything by default before the loader runs, then update to
granted when the user accepts. The neat part for server-side — consent state travels with each GA4 hit
to your container, so your server tags read it automatically. Set it once in the browser; the server
respects it.
<!-- 1) Run BEFORE the GTM loader. Everything denied until the user chooses. -->
<script>
  window.dataLayer = window.dataLayer || [];
  function gtag(){ dataLayer.push(arguments); }
  gtag('consent', 'default', {
    'ad_storage':         'denied',
    'ad_user_data':       'denied',  // added in Consent Mode v2 (required since Mar 2024)
    'ad_personalization': 'denied',  // added in Consent Mode v2 (remarketing)
    'analytics_storage':  'denied',
    'wait_for_update':    500        // ms to wait for the CMP before firing
  });
</script>

<!-- 2) Call from your CMP's "Accept" handler once the user consents. -->
<script>
  gtag('consent', 'update', {
    'ad_storage':'granted','ad_user_data':'granted',
    'ad_personalization':'granted','analytics_storage':'granted'
  });
</script>
Server-side Meta Conversions API (CAPI)
The biggest data-recovery win usually comes from sending conversions to non-Google vendors server-to-server. Instead of relying on the Meta Pixel firing in the browser (where it’s blocked or dropped), you send the same events from your server directly to Meta’s Graph API.
Build it with the official Conversions API tag from the server-side template gallery. Two rules matter: email and phone must be SHA-256 hashed before they leave your server, and the access token lives on the server, never in the browser.
// In production, use the gallery "Conversions API" tag. This is the request it builds.
const sendHttpRequest    = require('sendHttpRequest');
const getTimestampMillis = require('getTimestampMillis');
const JSON               = require('JSON');

const PIXEL_ID      = '1234567890';
const ACCESS_TOKEN  = data.accessToken; // store as a variable, NEVER expose to the browser
const GRAPH_VERSION = 'v21.0';          // bump to Meta's current Graph API version

const payload = {
  data: [{
    event_name:       'Purchase',
    event_time:       getTimestampMillis() / 1000, // Unix time in SECONDS
    action_source:    'website',
    event_source_url: eventData.page_location,
    user_data: {
      em:  eventData.hashedEmail,  // email + phone must be SHA-256 hashed
      ph:  eventData.hashedPhone,  // (the gallery tag hashes these for you)
      fbc: eventData.fbc,          // from the _fbc cookie
      fbp: eventData.fbp           // from the _fbp cookie
    },
    custom_data: { currency: eventData.currency, value: eventData.value }
  }]
};

sendHttpRequest(
  'https://graph.facebook.com/' + GRAPH_VERSION + '/' + PIXEL_ID +
    '/events?access_token=' + ACCESS_TOKEN,
  { method: 'POST', headers: { 'Content-Type': 'application/json' }, timeout: 5000 },
  JSON.stringify(payload)
);
Enrichment & privacy transforms
One of server-side’s best tricks: reshape data before it reaches any vendor. Here are three patterns you’ll reach for constantly — all written the way the sandbox actually expects.
Enrich an event correctly
// The original guide used new Date().toISOString() — that fails in the sandbox.
// Here's the version that runs. Use it inside a Variable or a custom tag.
const getTimestampMillis = require('getTimestampMillis');
const getAllEventData    = require('getAllEventData');

const event = getAllEventData();            // the event object as it stands
event.processed_timestamp = getTimestampMillis(); // epoch millis, sandbox-safe
event.server_id = 'sst-prod-1';             // tag which server touched it

return event; // downstream tags now see the enriched values
Redact PII before forwarding
// Drop raw email / phone from analytics hits while keeping the rest intact.
const getAllEventData = require('getAllEventData');
const event = getAllEventData();

// No Object.keys() in the sandbox — loop with for...in
for (let key in event) {
  if (key === 'email' || key === 'phone' || key === 'user_address') {
    event[key] = undefined; // remove sensitive fields
  }
}

return event; // GDPR/CCPA-friendly: vendors never receive the raw PII
Fire an HTTP request with proper success/failure handling
const sendHttpRequest = require('sendHttpRequest');
const logToConsole    = require('logToConsole'); // not console.log
const JSON            = require('JSON');

const url = 'https://api.yourcrm.com/collect';
const body = JSON.stringify({ event: eventData.event_name, value: eventData.value });

sendHttpRequest(url, { method: 'POST', headers: { 'Content-Type':'application/json' }, timeout: 5000 }, body)
  .then(function (result) {
    logToConsole('CRM responded: ' + result.statusCode);
    // Tell GTM the tag finished so it can move on
    if (result.statusCode >= 200 && result.statusCode < 300) data.gtmOnSuccess();
    else data.gtmOnFailure();
  })
  .catch(function () { data.gtmOnFailure(); });
Debugging: the two-tab Preview workflow
The fastest way to lose an afternoon is to build the whole pipeline, then wonder why GA4 is empty. Preview mode tells you exactly where the hit stopped. Open Preview in the server container (one tab), enable Preview in the web container (second tab), then use your site in a third — the “two-tab dance.” Replay it below.
Two error patterns cover most failures. “No client claimed the request” means no client matched the payload — check the client is installed and its priority. A red outgoing request means the vendor rejected the forwarded call — open it and read the status code (usually a bad measurement ID, a missing API secret, or an unhashed field). For a server-to-server source like a CRM webhook, add this header so its hits show up in the same session:
X-Gtm-Server-Preview: <paste the value from the Preview panel's "…" menu>What it actually costs
Server-side tagging is the rare analytics upgrade with a monthly bill, so plan for it. A single Cloud Run instance runs about $45/month; Google recommends at least two for redundancy. Drag the slider to estimate.
Two habits keep the bill sane: set a billing alert in GCP so a spike doesn’t quietly rack up charges, and log only what you need — logging every request in full is a common, avoidable cost.
Performance & privacy wins — with one honest caveat
- Faster pages. Moving heavy vendor scripts off the browser is a real Core Web Vitals gain on tag-heavy templates.
- Durable measurement. First-party
HttpOnlycookies survive privacy clampdowns, so returning visitors stay attributed. - Data governance. One chokepoint to strip PII, drop parameters, or enrich events before anything reaches a vendor.
The caveat older guides skip: sGTM is not an ad-blocker cure. Custom subdomains help at the margins, but modern blocker lists inspect request patterns and payload shapes, and a large share still catch custom-domain sGTM traffic. The durable wins are first-party cookies and server-to-server APIs — not invisibility.
FAQ
Is server-side tagging worth it for a small website?
Often no. If your pages are fast, conversions track cleanly, and you have no strict privacy needs, the extra cost and complexity outbuy the benefit. It pays off for high-traffic sites, e-commerce, and teams with real privacy or data-quality pressure.
Do I still need my web (client-side) container?
Yes, in almost every case. The typical setup is hybrid: the web container fires in the browser and hands its most valuable events to the server container for forwarding.
Should I deploy on Cloud Run or App Engine?
Cloud Run. It’s Google’s current default and recommended option — it scales to zero, deploys across regions easily, and usually costs less. App Engine still works but is the legacy path.
Will server-side tagging stop ad blockers from blocking my data?
Not reliably. A custom subdomain helps at the margins, but many blockers now detect custom-domain sGTM traffic by its patterns. The durable benefits are first-party cookies and server-to-server APIs like Meta CAPI, not evading blockers.
How much does it cost to run?
Plan for about $45/month per Cloud Run instance, with a recommended minimum of two — so roughly $90/month before scaling. Set a GCP billing alert to avoid surprises.
Why does GA4 show no data after I set everything up?
Usually the hit stops somewhere in the chain. In Preview, “No client claimed the request” means your GA4 client isn’t installed or is out-prioritized; a red outgoing request means the forwarded call was rejected — often a wrong measurement ID or missing API secret.
Do I have to implement Consent Mode v2?
If you have EEA/UK traffic and use Google’s advertising or audience features, yes — required since
March 2024. Set consent in the browser with ad_user_data and ad_personalization;
the state travels to the server automatically.
Wrapping up
Server-side tagging isn’t a magic switch — it’s an infrastructure decision with a monthly bill and a real setup curve. But for the sites that need it, the payoff is concrete: lighter pages, first-party cookies that actually last, cleaner data, and one place to enforce privacy.
Build it in order. Stand up the Cloud Run server, map a real subdomain, load the container
first-party, forward GA4 with server_container_url, wire Consent Mode v2, then add
server-to-server tags like Meta CAPI. Prove each step in Preview before trusting it — and you’ll move
from renting space in the browser to owning your own tracking pipeline.
8. Benefits, Pros and Cons of Server-Side Tagging
Benefits of Server-Side Tagging
Server-side tagging fundamentally transforms how businesses handle data collection and processing, offering enhanced control, security, and performance. When implemented properly, it moves data processing from the user’s browser to a controlled server environment, significantly reducing client-side load while providing more reliable data collection.
Key Advantages:
- Improved Website Performance: By reducing client-side JavaScript execution, pages load faster and provide better user experience
- Enhanced Data Security: Sensitive data processing occurs in a controlled server environment rather than the client’s browser
- Better Ad-Blocker Management: Reduces impact of ad-blockers on data collection
- Data Quality Control: Enables data cleaning and enrichment before sending to end platforms
- Technical Flexibility: Allows custom data processing and transformation
Potential Drawbacks:
Implementation Challenges:
- Higher Initial Setup Costs: Requires server infrastructure and technical expertise
- Complex Configuration: More intricate setup compared to client-side tagging
- Maintenance Requirements: Needs ongoing server maintenance and monitoring
- Development Resources: Requires specialized knowledge and development time
Technical Considerations:
- Additional server costs for processing and hosting
- Potential latency in data processing
- Need for regular security updates and maintenance
- More complex debugging and troubleshooting
Best Use Cases:
- E-commerce platforms with high transaction volumes.
- Organizations with strict data privacy requirements.
- Websites requiring complex data processing.
- Businesses focused on optimal website performance.
- Companies dealing with sensitive user data.
Implementation Recommendations:
- Start with a hybrid approach (both client and server-side)
- Gradually migrate critical tags to server-side
- Implement proper monitoring and error handling
- Ensure adequate technical resources for maintenance
- Regular performance and security audits
This shift to server-side tagging represents a significant advancement in digital analytics and marketing technology, despite its implementation challenges. For organizations willing to invest in the setup and maintenance, the long-term benefits often outweigh the initial complexities and costs.
Conclusion
Server-side tagging implementation requires careful planning and execution but offers significant benefits in terms of performance, security, and data quality. Key points to remember:
- Proper setup of cloud infrastructure
- Careful configuration of client and server containers
- Implementation of robust error handling
- Regular testing and validation
- Monitoring and maintenance procedures
Follow this guide step by step, and ensure thorough testing at each stage of implementation. Remember to keep security and performance optimization in mind throughout the process.
Leave a Reply
You must be logged in to post a comment.