

Here’s a comprehensive guide on server-side tagging implementation using Google Tag Manager:
Overview
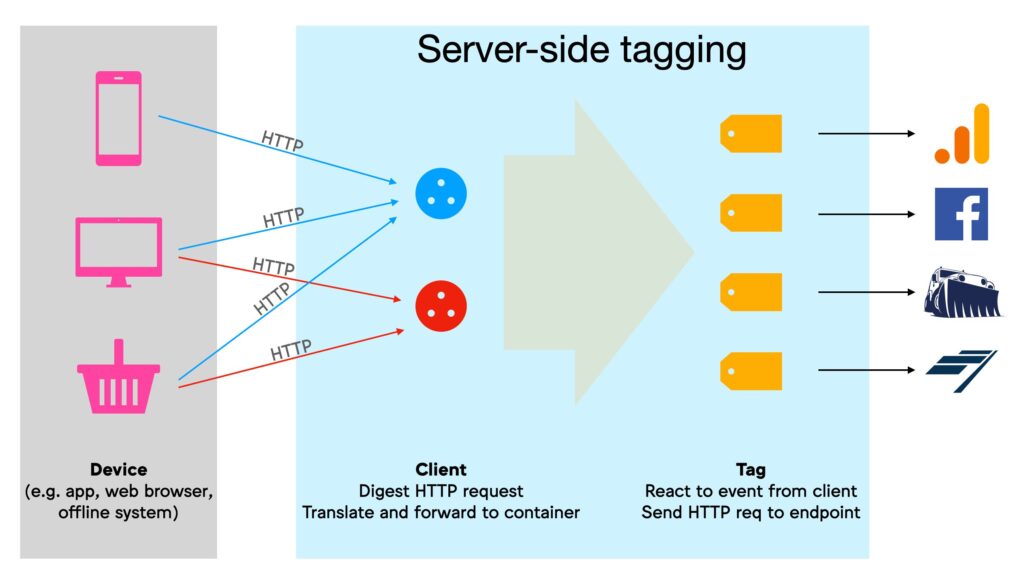
Server-side tagging represents a paradigm shift in how we handle analytics and marketing tags, moving processing from the client’s browser to a controlled server environment. This guide provides a complete implementation walkthrough using Google Tag Manager’s server-side capabilities.
1. Introduction to Server-Side Tagging
Benefits
- Improved Site Performance : By offloading tag execution to the server, client-side page load times are reduced, leading to faster website performance and improved user experience.
- Enhanced Data Security : Sensitive data is processed on the server rather than being exposed in the client’s browser, minimizing the risk of data breaches or unauthorized access.
- Better Data Quality : Server-side tagging eliminates issues caused by ad blockers, browser extensions, or incomplete client-side scripts, ensuring cleaner and more reliable data collection.
- Reduced Client-Side Code : With fewer tags running on the client side, your website’s codebase becomes lighter, easier to maintain, and less prone to errors.
- Greater Control Over Data Collection : You have full control over how data is collected, transformed, and sent to various destinations, enabling advanced customization and optimization.
Use Cases
- E-commerce Tracking : Accurately track purchases, cart abandonments, and other critical e-commerce events without relying on client-side scripts that may fail due to ad blockers or technical issues.
- Enhanced Conversion Tracking : Gain deeper insights into conversions by processing and enriching data on the server before sending it to analytics platforms. For example, append additional metadata or calculate custom metrics.
- Custom Event Processing : Handle complex event logic, such as combining multiple events into a single meaningful action, filtering out unwanted data, or triggering specific workflows based on predefined conditions.
- Data Privacy Compliance : Ensure compliance with regulations like GDPR or CCPA by anonymizing or masking sensitive information at the server level before transmitting it to third-party tools.
- Ad-Blocker Circumvention : Bypass common ad-blocking techniques that block client-side tags, ensuring your tracking remains unaffected and continues to collect valuable data even when users employ ad blockers.
2. Setup Requirements
Technical Prerequisites
// Required Google Cloud Platform setup
{
“project_id”: “your-project-id”,
“region”: “us-central1”,
“tagging_server”: {
“machine_type”: “n1-standard-1”,
“container_size”: “2”
}
}
Infrastructure Requirements
- Google Cloud Platform account
- Google Tag Manager account
- Server-side container
- Domain/subdomain for tagging server
- SSL certificate
3. Implementation Steps
Step 1: Create Server Container
Technical Prerequisites
These are the technical configurations and resources needed to set up the infrastructure for QR code tracking and data collection.
- Google Cloud Platform (GCP) Project Configuration :
project_id: Replace"your-project-id"with your actual GCP project ID. This is the unique identifier for your project in GCP.region: Choose a region (e.g.,"us-central1") that is geographically close to your target audience to reduce latency and improve performance.tagging_server:machine_type:"n1-standard-1"specifies the compute instance type for the tagging server. This configuration balances cost and performance for most use cases.container_size:"2"indicates the number of containers running on the tagging server. Adjust this based on expected traffic volume.
Infrastructure Requirements
2. Setup Requirements for Server-Side Tagging in GA4
Technical Prerequisites
These are the technical configurations and resources needed to set up server-side tagging for Google Analytics 4 (GA4).
- Google Cloud Platform (GCP) Project Configuration :
project_id: Replace"your-project-id"with your actual GCP project ID. This is the unique identifier for your project in GCP.region: Choose a region (e.g.,"us-central1") that is geographically close to your target audience to reduce latency and improve performance.tagging_server:machine_type:"n1-standard-1"specifies the compute instance type for the tagging server. This configuration balances cost and performance for most use cases.container_size:"2"indicates the number of containers running on the tagging server. Adjust this based on expected traffic volume.
Infrastructure Requirements
These are the foundational components required to implement server-side tagging in GA4.
- Google Cloud Platform (GCP) Account :
- A GCP account is necessary to host the backend infrastructure, including the tagging server. It also integrates seamlessly with other Google services like BigQuery for advanced data analysis.
- Google Tag Manager (GTM) Account :
- GTM is used to manage tags and triggers for sending data to GA4. With server-side tagging, GTM acts as a central hub for processing and forwarding events from various sources.
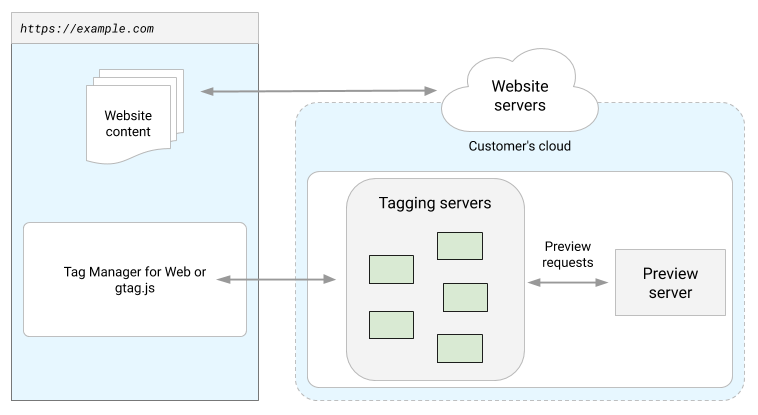
- Server-Side Container in GTM :
- A server-side container allows you to handle tracking events on the server rather than the client side. This improves data accuracy by avoiding issues like ad blockers, JavaScript errors, or incomplete page loads. It also enhances user privacy by reducing reliance on cookies and browser-based tracking.
- Domain/Subdomain for Tagging Server :
- You need a domain or subdomain (e.g.,
tags.yourdomain.com) to host the tagging server. This ensures that all tracking requests are routed through a dedicated endpoint, making it easier to manage and secure.
- You need a domain or subdomain (e.g.,
- SSL Certificate :
- An SSL certificate is essential for securing the connection between the tagging server and users’ devices. It encrypts data transmitted during tracking events, ensuring compliance with data privacy regulations and protecting sensitive information.
- GA4 Property :
- Ensure you have a GA4 property set up in your Google Analytics account. The server-side container will send all processed events to this property for measurement and analysis.
Why Use Server-Side Tagging in GA4?
- Improved Data Accuracy : By processing events on the server, you eliminate issues caused by client-side limitations such as ad blockers, disabled JavaScript, or incomplete page loads.
- Enhanced Privacy : Server-side tagging reduces the reliance on cookies and browser-based tracking, aligning with increasing privacy regulations and user expectations.
- Centralized Management : All tracking logic is managed in one place (the server-side container), simplifying updates and reducing the risk of errors.
- Scalability : Server-side tagging can handle high volumes of data efficiently, making it ideal for large-scale implementations.
- Customization : You can preprocess and enrich data before sending it to GA4, enabling more granular control over what gets tracked and how it’s structured.
Step 2: Configure Cloud Platform
bash # Configure GCP project
gcloud config set project your-project-id

# Enable required APIs
gcloud services enable run.googleapis.com
gcloud services enable cloudbuild.googleapis.com
Step 3: Deploy Tagging Server
# app.yaml configuration
runtime: custom
env: flex
service: gtm-server

automatic_scaling:
  target_cpu_utilization: 0.65
  min_num_instances: 1
  max_num_instances: 10
Step 4: Client-Side Implementation
// GTM client-side snippet
<script>
(function(w,d,s,l,i){w[l]=w[l]||[];w[l].push({'gtm.start':
new Date().getTime(),event:'gtm.js'});var f=d.getElementsByTagName(s)[0],
j=d.createElement(s),dl=l!='dataLayer'?'&l='+l:'';j.async=true;j.src=
'https://your-gtm-server.com/'+i+'.js'+dl;f.parentNode.insertBefore(j,f);
})(window,document,'script','dataLayer','GTM-XXXX');
</script>
Step 5: Server-Side Client Configuration
// Example GA4 client configuration
{
  "client_name": "GA4",
  "client_type": "gaCustom",
  "parameters": {
    "measurementId": "G-XXXXXXXXXX",
    "streamId": "stream_id",
    "apiSecret": "your_api_secret"
  }
}
4. Code Examples
Example 1: Custom Event Processing
// Server-side custom event template
function processEvent(event) {
const eventName = event.event_name;
const eventParams = event.event_params;
// Add custom processing logic
if (eventName === ‘purchase’) {
enrichPurchaseData(eventParams);
}
return event;
}
function enrichPurchaseData(params) {
// Add additional data
params.processed_timestamp = new Date().toISOString();
params.server_id = ‘GTM-SERVER-1’;
}
Example 2: Data Transformation
// Transform client data for server processing
function transformClientData(data) {
return {
client_id: data.client_id,
event_name: data.name,
event_time: Math.floor(Date.now() / 1000),
user_properties: {
user_id: data.user_id,
lifetime_value: data.ltv
},
params: data.parameters || {}
};
}
Example 3: Error Handling
// Error handling implementation
function handleServerError(error) {
  const errorEvent = {
    event_name: 'server_error',
    error_message: error.message,
    error_code: error.code,
    timestamp: new Date().toISOString()
  };

  logError(errorEvent);
  sendErrorNotification(errorEvent);
}
5. Testing and Validation
Test Implementation
// Test event sender
function sendTestEvent() {
const testEvent = {
event: ‘test_event’,
timestamp: Date.now(),
data: {
test_param: ‘test_value’
}
};
return fetch(‘https://your-gtm-server.com/collect’, {
method: ‘POST’,
body: JSON.stringify(testEvent)
});
}
Validation Steps
- Preview mode testing
- Real-time validation
- Debug endpoint monitoring
- Log analysis
6. Best Practices
Performance Optimization
// Implement request batching
class EventBatcher {
constructor(batchSize = 10, batchTimeout = 1000) {
this.events = [];
this.batchSize = batchSize;
this.timeout = batchTimeout;
this.timer = null;
}
addEvent(event) {
this.events.push(event);
if (this.events.length >= this.batchSize) {
  this.sendBatch();
} else if (!this.timer) {
  this.timer = setTimeout(() => this.sendBatch(), this.timeout);
}
}
sendBatch() {
if (this.events.length === 0) return;
const batch = this.events;
this.events = [];
clearTimeout(this.timer);
this.timer = null;

// Send batch to server
sendToServer(batch);
}
}
Security Implementation
// Implement request validation
function validateRequest(request) {
  const clientId = request.headers.get('X-Client-ID');
  const timestamp = request.headers.get('X-Timestamp');
  const signature = request.headers.get('X-Signature');

  return verifySignature(clientId, timestamp, signature);
}
7. Troubleshooting Guide
Common Issues and Solutions
- Connection Issues
// Connection health check
function checkServerConnection() {
return fetch(‘https://your-gtm-server.com/health’)
.then(response => {
if (!response.ok) {
throw new Error(‘Server health check failed’);
}
return response.json();
})
.catch(error => {
console.error(‘Server connection error:’, error);
notifyAdmins(error);
});
}
- Data Validation Issues
// Data validation helper
function validateEventData(event) {
  const requiredFields = ['event_name', 'client_id', 'timestamp'];

  for (const field of requiredFields) {
    if (!event[field]) {
      throw new Error(`Missing required field: ${field}`);
    }
  }

  return true;
}
Monitoring Setup
// Basic monitoring implementation
const monitoring = {
  logEvent(event) {
    console.log(JSON.stringify({
      timestamp: new Date().toISOString(),
      type: 'event',
      data: event
    }));
  },

  logError(error) {
    console.error(JSON.stringify({
      timestamp: new Date().toISOString(),
      type: 'error',
      message: error.message,
      stack: error.stack
    }));
  }
};
8. Benefits, Pros and Cons of Server-Side Tagging
Benefits of Server-Side Tagging
Server-side tagging fundamentally transforms how businesses handle data collection and processing, offering enhanced control, security, and performance. When implemented properly, it moves data processing from the user’s browser to a controlled server environment, significantly reducing client-side load while providing more reliable data collection.
Key Advantages:
- Improved Website Performance: By reducing client-side JavaScript execution, pages load faster and provide better user experience
- Enhanced Data Security: Sensitive data processing occurs in a controlled server environment rather than the client’s browser
- Better Ad-Blocker Management: Reduces impact of ad-blockers on data collection
- Data Quality Control: Enables data cleaning and enrichment before sending to end platforms
- Technical Flexibility: Allows custom data processing and transformation
Potential Drawbacks:
Implementation Challenges:
- Higher Initial Setup Costs: Requires server infrastructure and technical expertise
- Complex Configuration: More intricate setup compared to client-side tagging
- Maintenance Requirements: Needs ongoing server maintenance and monitoring
- Development Resources: Requires specialized knowledge and development time
Technical Considerations:
- Additional server costs for processing and hosting
- Potential latency in data processing
- Need for regular security updates and maintenance
- More complex debugging and troubleshooting
Best Use Cases:
- E-commerce platforms with high transaction volumes
- Organizations with strict data privacy requirements
- Websites requiring complex data processing
- Businesses focused on optimal website performance
- Companies dealing with sensitive user data
Implementation Recommendations:
- Start with a hybrid approach (both client and server-side)
- Gradually migrate critical tags to server-side
- Implement proper monitoring and error handling
- Ensure adequate technical resources for maintenance
- Regular performance and security audits
This shift to server-side tagging represents a significant advancement in digital analytics and marketing technology, despite its implementation challenges. For organizations willing to invest in the setup and maintenance, the long-term benefits often outweigh the initial complexities and costs.
Conclusion
Server-side tagging implementation requires careful planning and execution but offers significant benefits in terms of performance, security, and data quality. Key points to remember:
- Proper setup of cloud infrastructure
- Careful configuration of client and server containers
- Implementation of robust error handling
- Regular testing and validation
- Monitoring and maintenance procedures
Follow this guide step by step, and ensure thorough testing at each stage of implementation. Remember to keep security and performance optimization in mind throughout the process.
Leave a Reply
You must be logged in to post a comment.